


Grip strength. With the influx of TV shows like American Ninja Warrior (which we talked about on an #OCRChat a while back) and more people wanting to try out the great challenges that such shows hold, obstacles with various grip challenges have been popping up at more races for the past couple of years.
Just last summer, the Mud Ninja race I do here in Ohio added two such obstacles, and then last Sunday my Spartan Sprint showed me that I need to work on this facet of my game in a big way (to the tune of 120 burpees). And after all the great advice that flowed from last Tuesday’s #OCRChat on grip exercises, today’s post is going to be all about grip strength and what you can do to develop it!
So let’s dive into the world of OCR grip strength.
I’ve broken down the types of grip strength one needs in Obstacle Course Races into three categories (granted, this may not match the categories that other grip strength experts and trainers suggest, but it’s what makes sense to me for our sport). It’s very important to keep in mind that grip strength is not just a hand strength issue, but also a forearm strength one.
Is your grip strength a weakness in your #OCR game? Fix that with our tips! Share on XMake a tight fist with one hand, and feel you forearm with your other hand. And take a look at that forearm. There’s a whole lot going on there when you’re gripping something tightly – you can feel the muscles, tendons, and ligaments in your entire hand and forearm working together as a unit. It’s important when we’re training to make sure that we’re working that grip as a unit, for that reason.
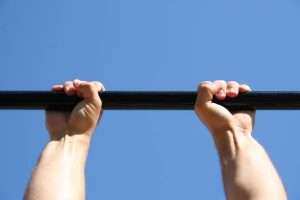
Hanging grip for OCR: used for monkey bars, etc.
Hanging Grip
This is where you’re just hanging from something – your palm is more or less facing forward and you have the use of your thumb to give you some extra hold. Think pull-ups or rings. This sort of grip would come in most handy for obstacles like monkey bars, farmer carries (where you have a handle of some sort), and things like that.
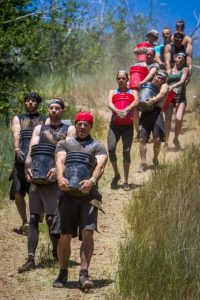
A Fingertip grip comes in handy for obstacles like Bucket Brigade or the Traverse Wall
Fingertip Grip
This is a grip where you don’t have the use of your thumb (or its effectiveness in keeping your grip is lessened) due to the size of the object you’re gripping. An example of this would be the Traverse Wall at a Spartan Race, or the Bucket Brigade. The 2-by-4 blocks on the wall are too wide for most folks to really use the thumb effectively unless you’re used to palming basketballs or something, and the Bucket Brigade can involve just holding up the bucket with your fingertips. Check out the picture to the left for an example of where this grip can be used.
Another place that such grips are used are the wall climbs – where you’re grasping onto the top of a wall and trying to pull yourself up. Thumbs are almost completely out of the picture in this case.
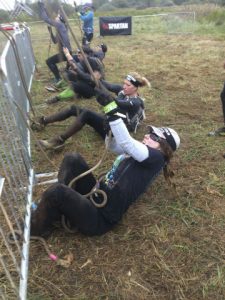
The rope grip is a variation of hanging grip, with the hand at an angle.
Rope Grip
The third grip that we’ll discuss here (and the one where I needed the most work, apparently) is the rope grip. In this grip style, your grip is more of a pulling style, and the thumb is frequently placed more firmly on the index finger than it is on the hanging grip, where the thumb tends to lay on the index and middle finger for stabilizing the grip. The palm is also facing more slightly toward you.
It’s also grasping its hold at more of an angle, so the forearms are worked differently. This is obviously important for rope climb obstacles, but also for obstacles such as the Hercules Hoist in the Spartan Race. Some of the handholds on various rigs use the Rope Grip as well.
How to train these grips:
One of the absolute best exercises, I think everyone will agree, is the pull-up. It’s a grip strength as well as lats, biceps, back, and core exercise that builds an entire chain of muscles as a unit. It’s directly applicable to many obstacles in a race, too.
I think everyone knows how to properly do a pull-up, but in case you don’t:
- Hang from a pull-up bar, with your hands at shoulder width or slightly more than shoulder width apart, and your hands facing away from you.
- Pull yourself up, with as little movement in your legs as possible.
- Get your chin above the bar (or another, harder variation is to get your chest to the bar) and lower yourself back down to a full extension in the arms. That’s one rep.
I’m going to suggest practicing non-kipping pull-ups for training (kipping is where you kick your legs while pulling to give your body some momentum on the way up). We’re not just trying to crank out numbers for a Crossfit Open workout or something here, we’re just working on strength and technique and trying to build that strength and endurance.
The pull-up will train your hanging grip really well, obviously, because you’re… well… hanging.
Lack the equipment for #OCR obstacles like rope climbs? Our tips will help you train without them! Share on X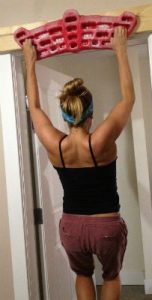
Using a fingerboard to train fingertip grip strength.
Another variation on the pull-up that can train the fingertip grip is a finger-tip pull-up. Obviously, you can just do pull-ups right on your bar and not use your thumbs, concentrating on just the finger-tips. Or you can get something like the apparatus to the right, a fingerboard. You’ll see this sort of thing in many climbing gyms, where they have fingerboards for training purposes. They have multiple types of grips on them with different angles, distances apart, and more. You can get the thumb as involved or uninvolved as you want.
If you don’t have a fingerboard (which you can get from rock climbing supply stores and gyms, usually), then you can use the molding over a doorframe as a pull-up bar, assuming it can support your weight. Not sure how you’ll check this without just trying, but…
You can also use a wall – if you’ve got an eight-foot or higher wall for climbing practice available to you, that’s perfect. Or find playground equipment that might do the trick.
There are a ton of places you can probably find to work this grip. And obviously, rock climbing or bouldering is a fantastic way to work this grip regularly. There are climbing gyms all over the country now, or in many places there are public climbing walls at parks and the like – or even playground equipment with rock climbing handholds built onto them. Example: most of the YMCAs in Columbus, where I live, have climbing walls with free-climb times or classes.
A variation of the pull-up that can help with the rope grip is the chin-up. The muscles worked in a chin-up, where your hands are facing toward your body and your thumbs are facing away from each other along the bar, are very similar to the muscles worked in the rope climb or Hercules Hoist. A narrower grip (hands four-to-six inches away from each other on the bar) is also helpful for stimulating the muscles used in the rope obstacles as well.
It can be very tough to find a rope climb for many people – just throwing a rope over a tree limb is a possibility for many, but if you don’t have your own tree to do this with, a lot of parks and such frown on things like this because 1) it can damage the trees if done too often, and 2) the liability issue that most municipalities have to deal with. So we need to find options.
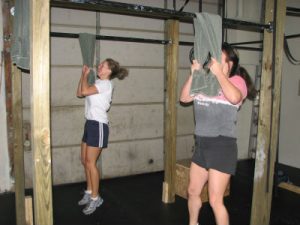
Using a towel to do pull-ups can simulate the rope climb nicely.
One is to use a towel. That’s right, Douglas Adams was correct when he said that a towel is the most useful item in the universe. And cheap towels are available in all sorts of place – you can probably find a few for a couple bucks at a Goodwill store or something similar.
Throw the towel over the bar, and do your pull-ups with the ends of the towel as in this picture. To make it harder on your hands, grasp less of the towel. A variation of this could also be to work pulling with your hands at different points on the towel, to simulate the rope climb even more.
Or, you can even do an exercise like this one: start with the towel over the bar, and hang with your feet off the ground. With the left hand, pull one end of the towel toward you and let the right hand go up toward the bar. Then reverse that – pulling with the right hand while letting the left hand move up toward the bar, never releasing the towel. This will simulate the rope climbing action really well.
You can also use two towels thrown over the bar, each hand grasping both ends of its respective towel for a variation on this (and to help with some of those rigs with rope crossings).
Still hanging around? Well, start hanging!
Now, here’s the kicker: you don’t need to actually pull yourself up to benefit your grip strength. Just hanging from a pull-up bar, door-frame, wall, etc. is going to benefit your grip as well. I recommend taking time each day to just hang from a bar. Try to work up to a minute at a time in the various grips, as described above, and then do sets of a minute (or more, as you progress). Also, work on swinging in the various grips – both forward and back, and left-to-right. And hang from one arm/hand.
And when you’re hanging, do your best to relax everything but your hands. Stretching those hanging muscles and lengthening them is just as important as tensing them – and can help reduce injury in the shoulders, lats, and more. You’ll still be working that grip strength and endurance (especially the endurance as you lengthen the time of your hanging) and helping with injury prevention at the same time. Talk about your win-win!
So that’s it. I hope you’ll try some of these techniques out and let me know how they work for you.
What other grip strength exercises do you know of? What’s worked for you? Share your thoughts on our message board!
